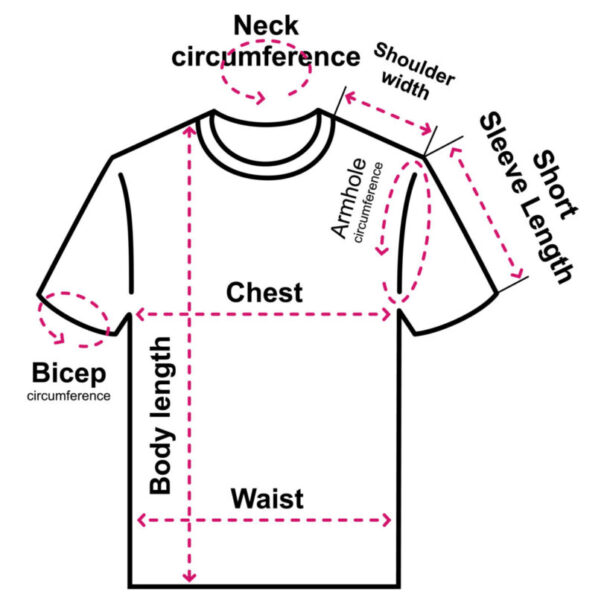
Measuring a garment involves several steps to ensure accuracy.
Here’s a general guide on how to measure a garment:
- Lay the garment flat: Place the garment on a flat surface like a table or the floor. Smooth out any wrinkles or folds so the fabric lies flat.
- Use a measuring tape: A flexible measuring tape is the most accurate tool for measuring garments. If you don’t have one, you can use a ruler or a yardstick, but it might be more challenging to measure curved or longer distances accurately.
- Identify key measurements: Determine which measurements are necessary for the garment you’re measuring. Common measurements include:
- Chest/bust: Measure across the fullest part of the chest/bust, typically under the arms.
- Waist: Measure around the narrowest part of the waist.
- Hips: Measure around the fullest part of the hips.
- Length: Measure from the highest point of the shoulder down to the hem for tops and dresses. For pants and skirts, measure from the waistband to the hem.
- Sleeve length: Measure from the shoulder seam to the end of the sleeve.
- Inseam: Measure from the crotch to the bottom hem of the pants.
- Start measuring: Place the measuring tape at the starting point of the measurement. For example, if measuring the chest/bust, start from one side seam, and wrap the tape around the fullest part of the chest, ensuring it’s parallel to the ground.

- Record the measurement: Once you’ve obtained the measurement, make sure to write it down or remember it.
- Repeat for other measurements: Continue measuring all the necessary dimensions of the garment, following the same process as above.
- Check for consistency: Double-check your measurements to ensure accuracy. If possible, compare your measurements with the garment’s size chart provided by the manufacturer to ensure accuracy.
Remember, precision is key when measuring garments, so take your time and ensure you’re measuring accurately to get the best fit.
